

ConvertKit 101: Beginners guide to sending broadcast newsletter-style emails

Pre S. If you’re new to ConvertKit, you may benefit from reading ConvertKit for beginners: Complete guide to how it works and important terminology first.
If you’re still researching email marketing software and are on the fence about whether ConvertKit is right for you, I suggest you check out Why I chose ConvertKit for my email marketing over MailChimp, Squarespace Campaigns, etc.
Ready to get started with ConvertKit? Try the paid plan for free for 30 days. (Yes! That’s an affiliate link!)
The broadcast email (and why your business needs it)
If you’ve been following along in my business, you’ve probablyyyy noticed my love for email lists.
Now, I’m obv hugely in favor of a kick-ass website (kinda the whole reason I started my biz) but just to show you how important an email list is when starting a business, I once wrote a blog post on How to collect emails and send an opt-in gift…before you have a full website! 😱
It’s that important. (And this post should tell you why.)
So, what’s the easiest way to communicate with people on your fancy new list? ConvertKit! More specifically, ConvertKit’s broadcast feature. (That’s an affiliate link, btw!)
ConvertKit’s broadcast feature allows you to schedule and send emails to your entire list in one go, be it dropping in for a weekly newsletter highlighting your latest blog post, using promo emails to raise hype around your upcoming launch, or inviting your audience to a special event!
Whatever it is you have to say, a broadcast email is the fastest and easiest way to say it.
But what if I don’t want to send the email to my entire list? (Don’t worry, we’ll cover that too.)
How to use ConvertKit to send a broadcast or newsletter-style email
1. Create a new broadcast
From ConvertKit’s main navigation select Broadcast.

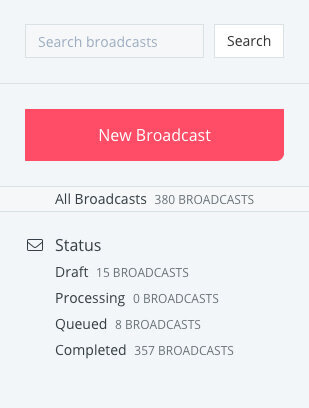
Then select New Broadcast.
Pro-tip: Looking for a past email you sent? Wondering where that draft you just created went, or when your next email is scheduled?
Use ConvertKit’s Status feature to sort your broadcasts by clicking on any of the status links!
(Or, use that handy search bar!)
2. Tell convertkit which subscribers will receive your broadcast
If it’s your weekly newsletter, chances are you will be sending the broadcast to all your subscribers (with a few exceptions, which we will go over later in this post!)
But say for example you want to send a reminder email only to those who registered for your upcoming webinar, or to those who signed up to your email list via a specific freebie opt-in form (showing you they might be interested in a paid product on that same topic!)
The easiest way to tell ConvertKit who to send your email to is through the use of Subscriber tags!
Need a refresher? Check out How to correctly tag your subscribers in ConvertKit.

To send an email to all your subscribers, simply select Matching > All and then click the Add Filter button to bring up the dropdown pictured.
Select All Subscribers and skip on down to step 2, friend!

To send your broadcast to a select group of people, first select Matching > Any and add your new filter.
In the settings of your filter, select Subscribed To > Tags and then use the dropdown to select the correct tags(s).
This will ensure that only Subscribers tagged with that specific tag will receive this email.
3. Tell convertkit which subscribers shouldn’t receive your broadcast
There are a few occasions where you might not want to be popping into someone’s inbox.
For example, if someone has opted out of promotional emails and only wishes to receive your weekly newsletter (check out How to let subscribers opt-out of launch emails in ConvertKit for more on that)
Or, if has already purchased the product that your broadcast email is promoting, you’d want to be sure to tell ConvertKit to exclude them as well!
This is especially important when dealing with GDPR consent laws. If someone from the EU visits your site and signs up to receive your freebie download.
Sure, they are *technically* on your email list, but you may or may not have consent to email them. (More on how to stay GDPR compliant here.)

To exclude a certain group of subscribers, create a second filter group by pressing Add Filter Group.
Select Matching > None (veryyyy important) then set your filter settings to Subscribed To > Tags then use the dropdown to select the tag you wish to exclude.
Ps. Looking for a quick way to double-check your work? Check out the number of subscribers listed in red to tell you how many people will be receiving your email. This is usually a dead giveaway of something gone wrong!
4. Draft Your Email Content and Subject Line(s)
It’s time to head over to the Content tab of your ConvertKit window where you will begin drafting the actual email!
You will notice that ConvertKit kindly gives you the option to test out two subject lines. First, it will send the email to a small percentage of the selected recipients, half with one subject line A and half with subject line B.
A few hours later, ConvertKit will send your email to the remaining recipients using only the subject line that performed best in terms of email open rate.
(Keep in mind, you only want to use this handy feature if your email is not time sensitive!)
To split-test your subject lines, simply click the A/B button to the right of the subject line and enter your second option.

Next, draft your email content!
To include your subscribers first name in your greeting, place your cursor where you want their name to go, hit that Personalize button, then select Subscriber’s name.

5. Preview your broadcast before sending

Your email may not always send exactly as it appears when you are drafting it. It’s important to preview your broadcast before you send that baby off!
To the right the same page, select either Browser or Email to preview your content.
See that duplicate button? This is a handy way to create all the same recipient settings when scheduling several emails at one time!
6. Schedule and send!
Now that you are happy with how your email looks, it’s time to press Save, and Next Step.
ConvertKit will also show you a preview of your content on this page, so it’s really up to you how you choose to check your work!
If you are ready to send it off, click Send Broadcast!


If you prefer to batch your work (highly recommend), you can also schedule your broadcasts in advance!
To schedule your broadcast, select Schedule and then use the dropdown to select first your date, then your time.
And that’s how it’s done! Ready to send out that first broadcast and start communicating with your email list? You can try out ConvertKit for FREE for 30 days!
That’s an affiliate link, btw! ☝️ If you make a purchase through this link, I’ll earn a commission at no extra cost to you. Myself and my margarita fund thank you kindly!
Ps. If you are looking for more email marketing tips and tutorials, simply scroll on down for my list of suggested reading!


You’ll also love . . .
How to collect emails and send an opt-in gift, before you have a full site
Here’s when to use MailChimp or ConvertKit (based on your stage of business)
3 steps to creating an opt-in gift your audience can’t wait to subscribe for
How big does my email list need to be before launching an online course?
How to let subscribers opt-out of launch emails in ConvertKit