

Squarespace basics: How to set up your e-commerce online shop (updated 2023)

Prefer to watch?
HERE’S THAT VIDEO FOR YA!
MENTIONED IN THE VIDEO…
10% off your first years Squarespace subscription - 10% off with code PAIGE10*
Creative Law Shop - 10% off with code PAIGE10*
Squarespace Ecommerce Inspiration (3 of the best online stores created in Squarespace)
How to create an online store on Squarespace - UPDATED FOR FLUID ENGINE
Being a Squarespace Newb is a great place to be! So many possibilities ahead! Buuttt... you also have a zillion questions, so, I put together a bunch of "Squarespace Basics" posts to help you along your way!
Today we're talking E-Commerce, or, in simple terms, setting up shop on Squarespace! But before we do...
If you wanna dive deeper into any of the "less Squarespace store specific" bits of this post - for example, what blocks are, pages and navigation options, how to use site styles, etc make sure to check out the other posts in this series!
Here are those Squarespace posts in order for ya…
So without further ado... let's set up shop!
How to set up an online shop in Squarespace 7.1 (Fluid Engine)
First things first... choosing a template
I actually go into this in waay more depth in this post (all about choosing the right template for your website in Squarespace 7.1) but... to give you the quick version - this is my fail-safe formula (oh and don't forget that every template in Squarespace 7.1 can be made to be THE SAME & has access to the exact same functionality (eg they can all have stores, all have blogs etc etc - so don't worry tooo much about this!)
Tip 1:
Choose a template that's close to the style you love - layout, colors & fonts (this means fewer changes for you to make later, which means more time saved, which means more moments for chillin' with a Marg, and that's what we're all about!)
Tip 2:
Don't choose a template that's "made for your sector". Eg Yoga teachers - don't choose the Yoga teacher lookin' template, and coaches, don't choose the coach one. Why? Because you'll look like all the other businesses that have Squarespace websites in your sector & I don't want that for you!
Next step - start your site!
Now you've chosen your template, you're going to start your trial site (don't panic about the 2 week limit - I've got a little-known secret to help you extend that later on in the post!)
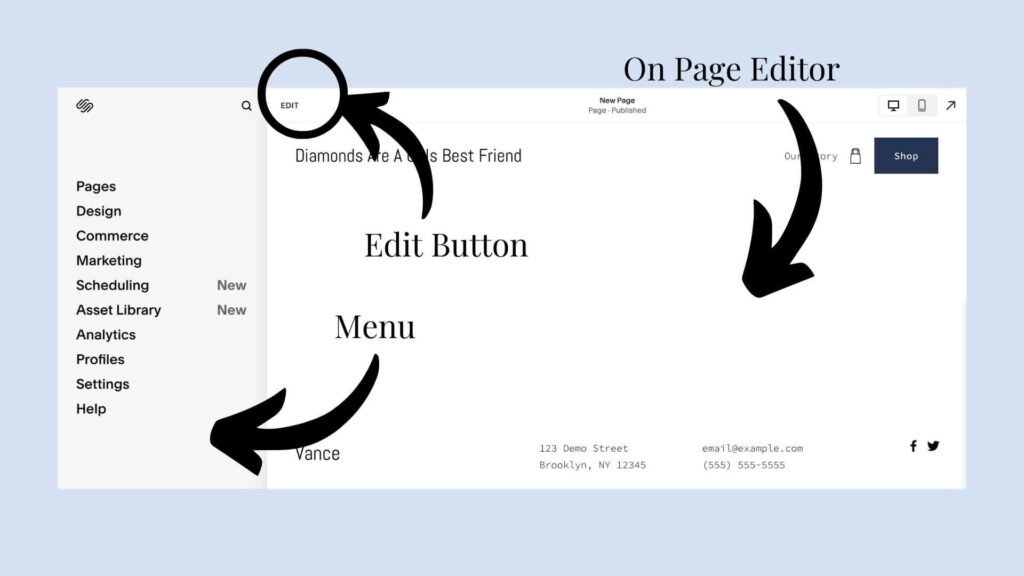
Now first things first a quick explainer on how to use the "back end 🍑 " of Squarespace.
When your site opens up you'll see that we have the main menu on the left-hand side, and the editor on the right. We're going to use both of these as we set our store up, but let's start by creating a quick home page for our shop.
Creating our store homepage
In order to create a beautiful homepage for our new store, we're going to hop into the "Pages" section, click on the home page & then edit (Pages > Home Page > Edit)
Don't see the edit button? Look in the top left-hand corner of the page.
Because we're smart and we chose a template that we liked the style of we're going to have an easy job of personalizing the thang! (Made even easier by the wonderful new Fluid Engine!) Sooo...
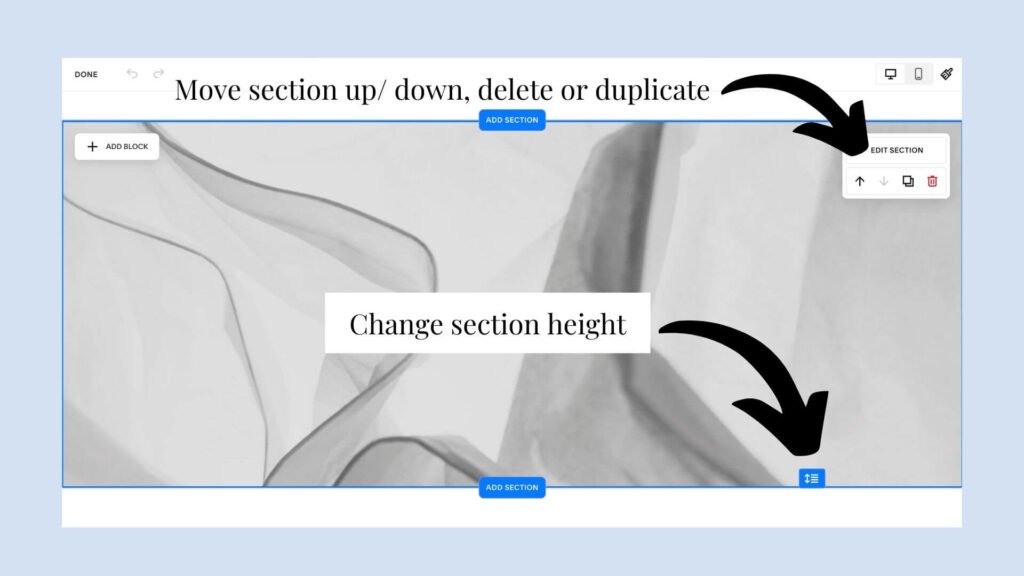
Delete any sections you don't need
First things first I'm going to get rid of any sections I don't want, simply by clicking the little trash icon on the right-hand side of the section.
Reorder the sections that are left
Then you'll want to reorder any sections by moving them up or down on the page by using the little arrows on the right-hand side (conveniently just next to the trash can icon!).
Now I can get to work editing & personalising the content that's left (as well as adding any other sections I need!)
A quick note on Fluid Engine Sections
Fluid Engine sections are not mega different from Squarespace sections in Classic editor, but there are a couple of things to know (and if you're new to Squarespace full stop, defs listen in here!)
To add a section, you will hover between (or above / below) an existing section and click "add section" (easy right!)
Then to manage the height of the section, you'll find the little blue icon that lives toward the bottom right of the section & drag it up or down to make your section longer or shorter.
In the top right hand corner of each section (close to the trash can & up/ down arrow) you have the "Edit Section" option - and if you click into this you have tons of other choices & options to style the section itself.
I'm not covering these today but it's useful to know where they are!
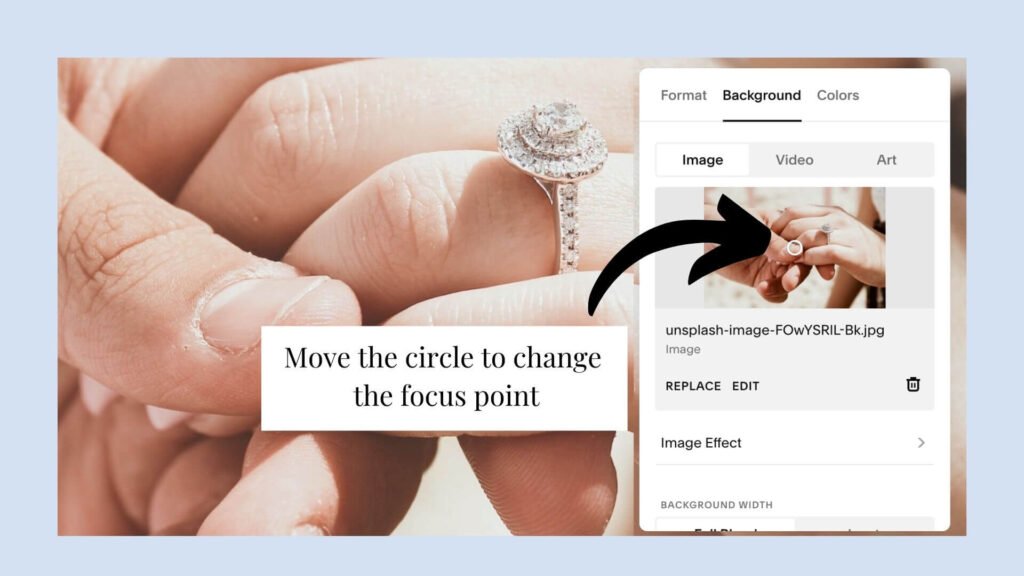
PS... This is also where you can add a background image to your section (either by uploading it from your desktop or chosing from the stock images available inside Squarespace.
PPS... Insider tip - if your image isn't showing up how you'd like, for example if the part you'd like to focus on is not in the middle, drag and drop the white circle focus point to the part of the image you'd like in the center of your section.
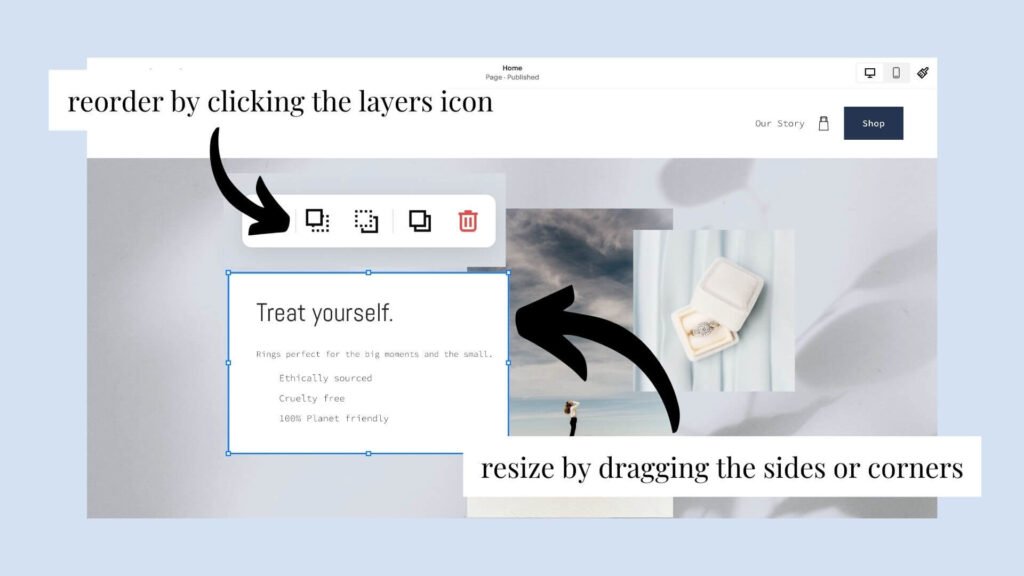
A quick note on Fluid Engine Blocks
Soooo... Fluid Engine (the new Squarespace editor) means a big change in how we add, move, and manage blocks on our site (I highly recommend you watch at least this bit of the Youtube Episode to see this in action)! But in short
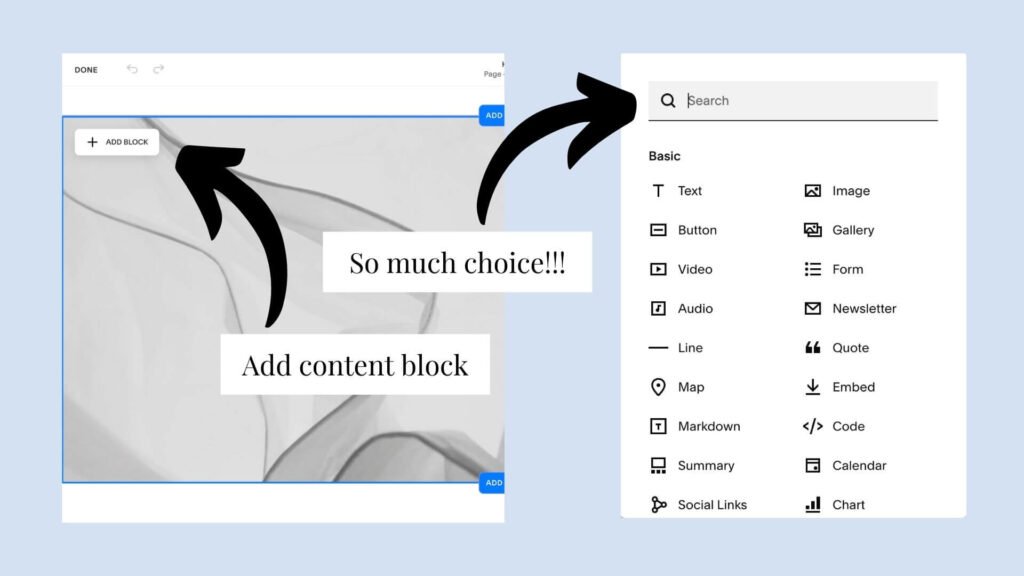
Click the plus "Add block" button to add a content block
Drag and drop your new content block around to move it
Pull out from the corners or sides to resize it
Use the dashed square, in front of a solid square icon to change the order of blocks in your layers (for example to put text on top of an image, or an image on top of a shape block).
There are sooo many different type of block options - from text, to shapes, to images, maps and more. On my store homepage I'm just using a few of the many options!
Personalizing the content on your homepage
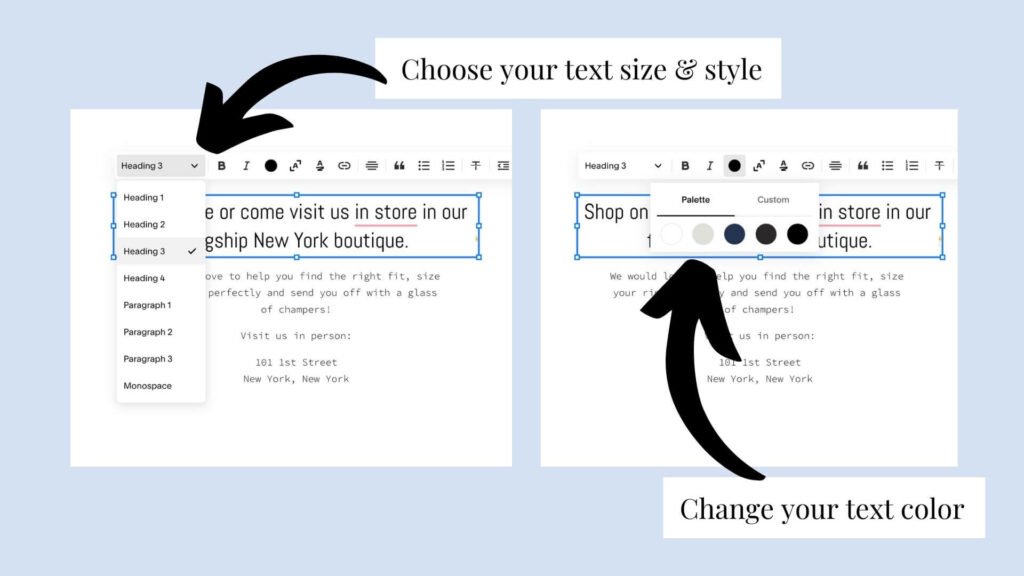
Next stop, you're going to want to replace any of the Squarespace copy with your beautiful words. To do this, simply click into the text boxes and type away. You can select from Header 1, Header 2, Header 3 or Header 4, and also Paragraph 1, 2 or 3, depending on the style and size of the fonts you'd like to have.
When you click on one of the text blocks, you can also choose from other styling options - think bolding, italics, colors, bullet lists etc! the world's your oyster my friend!
Then, just like I described above, you can go ahead and resize the block, if you'd like by pulling out or in from the corners or edges, and drag and drop the text box where you'd like it to go.
You can also adjust the layers if you'd like!
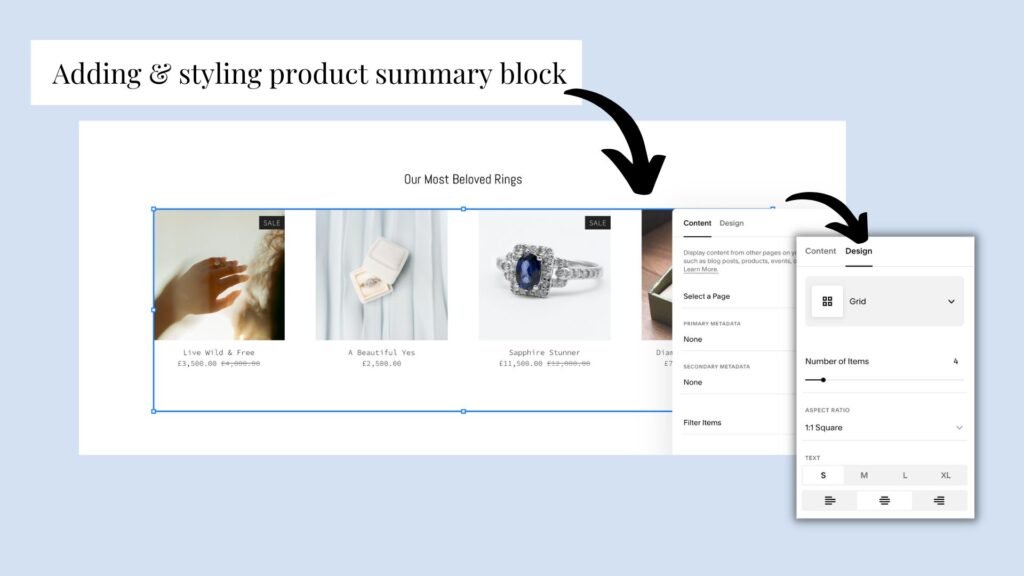
Adding a product summary block to the homepage
A fabulous way to show off your best products on your homepage, or any other page for that matter, is to create a summary block to show a few selected products in all their glory... now we actually can't do this until we've got some products in our store (duh!) so let's do that first and then we'll hop back to this part.
Now to creating my online shop itself!
In order to sell your first product or service on Squarespace you have to create an actual shop page (need a refresher? Read up on store collection pages in Squarespace basics: pages & navigation options).
We're going to add a shop page by clicking on the "Plus icon" in the pages menu, and selecting "Store" (the one very conveniently, with an icon like a shopping cart!)
I can choose for my store to be in my main navigation if I add it in the top section of my pages (helpfully called Main Navigation", or in the not linked section (meaning it exists as a page but isn't in my main header navigation) if I add it in the bottom.
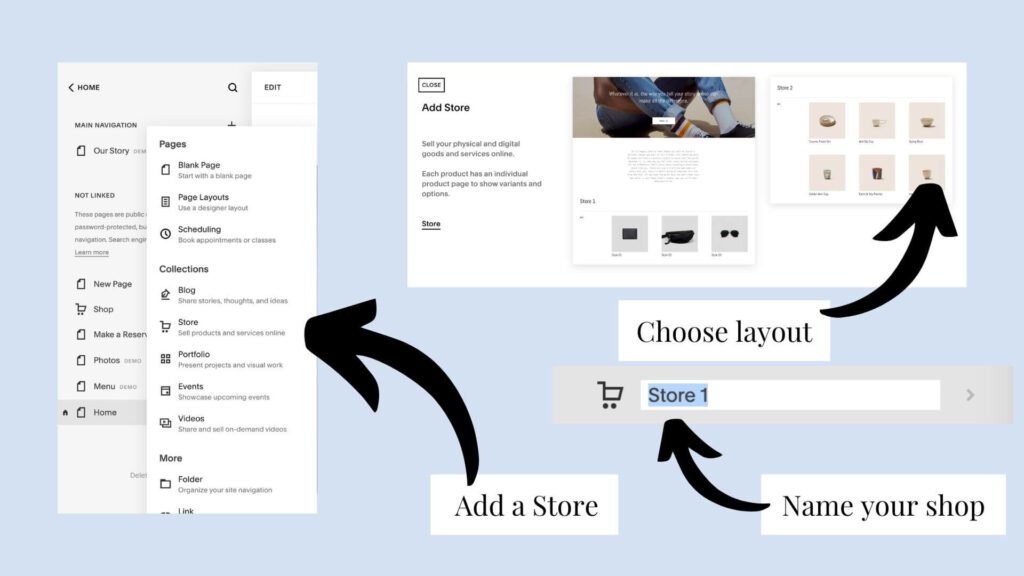
Added your store in the wrong place?! Don't panic friend just drag n drop it so it's in the right spot!
Once you've done this, click onto it, choose your store layout of choice (don't worry too much about it, you can also change later!) and your store is ready to rock!
Adding products to your online store
Click on your shop (home > pages > shop) then add a new listing by clicking on that plus sign!
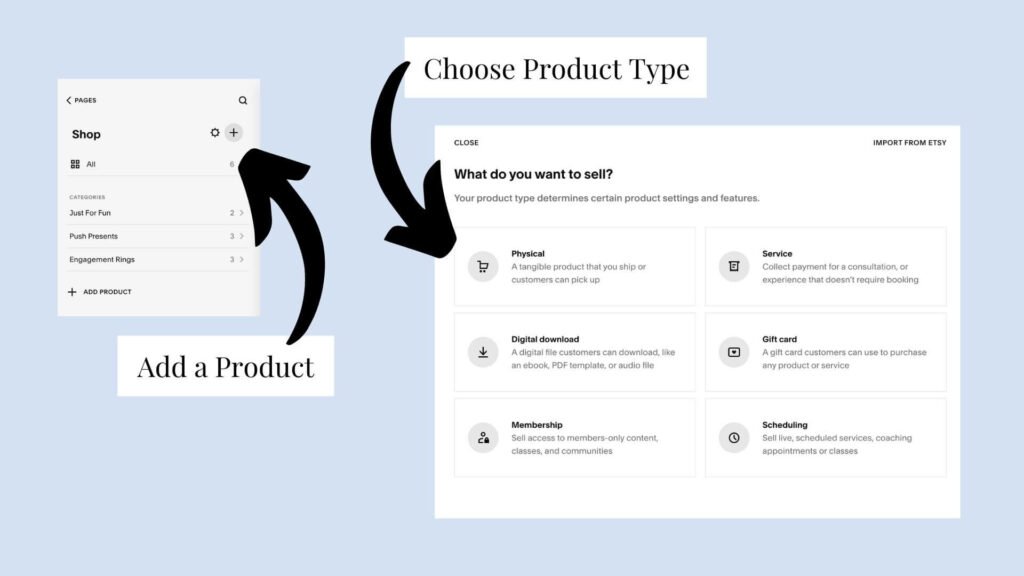
Next, you’ll need to tell Squarespace what type of product listing this is, so it knows which information to ask you for when setting up your product. Here’s a superrr quick rundown of your options:
Physical: This lets Squarespace know that a physical product is going to change hands and needs to be shipped or delivered to your customer.
Digital: This tells Squarespace that no shipping address is needed! This product will be delivered to your customer electronically via a link in an email.
Service: This tips Squarespace off that no product needs delivering, electronically or physically and that in order to fill this order, a service will be provided.
Scheduling: This is for a service that takes place on a specific date & time, like a hairdressers appointment, coaching session or massage. When the customer purchases their slot, they also book their time with you!
Gift Card: Pretty self-explanatory! Similar to a digital product, only your customer is receiving a store credit rather than a digital download.
Memberships: This relates to member areas, where you can set up spaces for members only content, classes, courses and communities.
Building product listings & editing inventory
Thankfully, Squarespace has made using their product listing editor pretty straightforward. Still, there are few important steps you will not want to miss!
I’m going to quickly walk you through the most important tabs within the product editor window, so you know what goes where when building your listing.
PS... Quick tip for ya, make sure to delete out the Squarespace demo content beforehand & start afresh with your store shelves empty & ready for your gorge products!
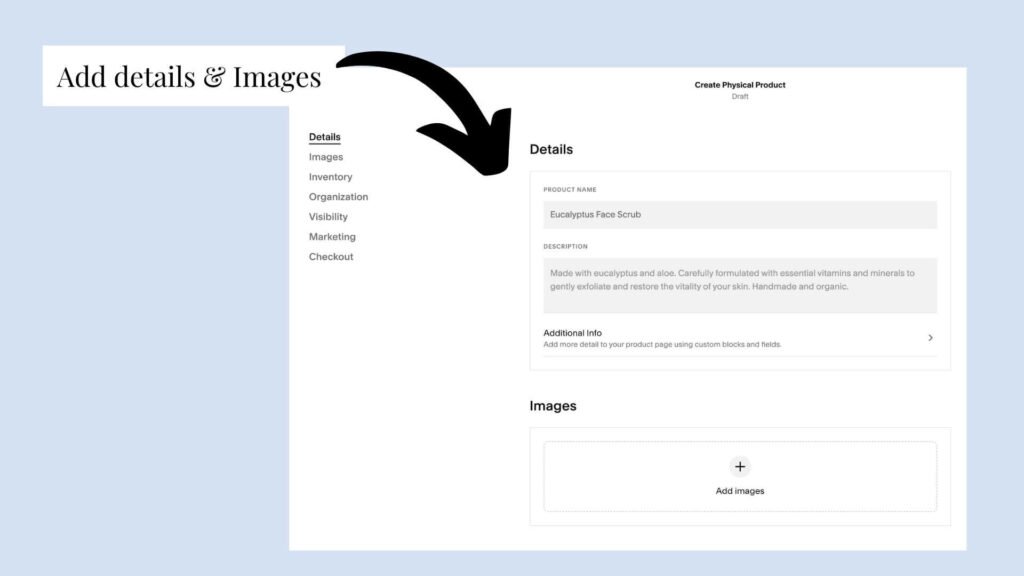
Product Details
Your first step for any listing, regardless of the product type is, under the details tab, name your product, add a beautiful description (don't forget your SEO keywords!) and then upload any images you want to appear on that product’s page.
Next we're going to add the price of our product. Want your item to go on sale? Pop in a sale price and check or uncheck the box as needed to display or hide the sale price. (Looking for more advanced discount and sale pricing options for your store? You’ll want to bookmark this handy little help doc for later.)
Additional Info Tab
Have some information that is important for your customer to know, but is not exactly sexy enough to include in the product description?
You’ll want to add that here. What it’s made of, where it’s made, size, weight, disclaimers, warranties, turn-around time, etc. Basically, anything that could be used to explain in more depth what the customer can expect when purchasing that product or service. This will always appear below your products images and description.
Pro tip: you can add any type of content block your little heart desires here in the additional info tab (buttons, images etc.) so don’t feel like you are limited to just wall-to-wall text when showing off your product! The options are endless!
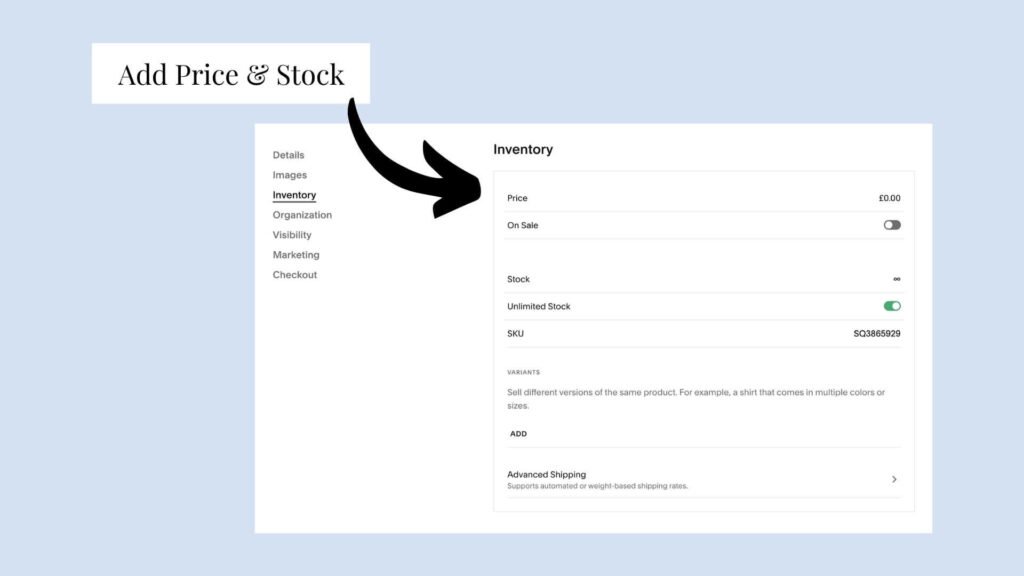
Inventory
Here's also where we can choose whether our item is limited stock or unlimited stock. A good example of where we might have unlimited stock is for something like a digital download - limited stock might be an antique ring where there's only one, or Tee shirts where we did a print run of 100.

Variants
Also under the inventory section, we find variants. Product variants are super handy if you have a bunch of different versions of the same thing. A great example of this is tee shirts... for example, we have 5 colors and 3 sizes, so each green tee is available in small, medium, and large, as is each red tee etc...
Now here comes the magic of Squarespace! If I put in my 5 colors in a variant box (I'll call it color) and my sizes (in a variant box which I'll call size)... then Squarespace will make me a looongg list of the different combinations of each color with each size!
I can then add the stock inventory for each if my little heart desires (imagine I just have one medium green tee left, but 27 small red tees), and I'm all set!
You can also see that I can set different prices for them if I want (imagine a ring that comes in variants with different metals which have a different price) and add dimensions too.
For gift cards this is also where you can set the different values for each card. Similar to the pricing and variants tab, this tab allows you to tell Squarespace the different gift card values you wish to offer in your shop. ($10, $25, $50, etc.)
Now the customer can see drop-downs on that product page to select the combination that suits them, rather than you having to create a separate product page for every single combination or variant of that same item.
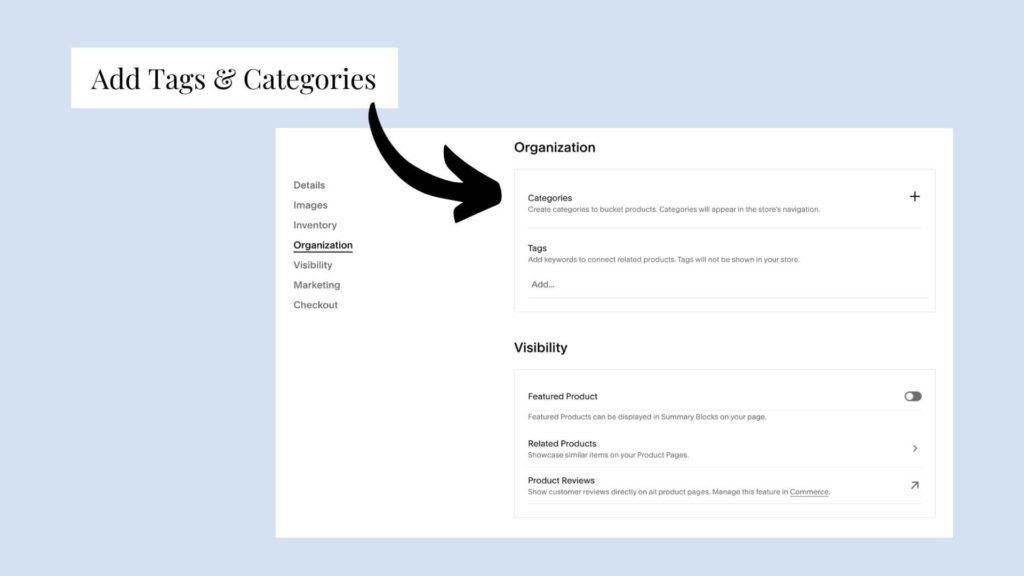
Organization (AKA Tags & Categories)
Now if you only have a couple of products in your store, this might not be mega important, but as soon as you have a bunch, there is nothing more important than organizing them well!
I like to think of categories as the big headers (like Dresses) and then I might use subcategories underneath this to break them down further (Like mini, midi, and maxi).
Tag's I'd use for more general search criteria that could apply across a bunch of categories, like "Suitable for Wedding", "Winter" or even tagging by color.
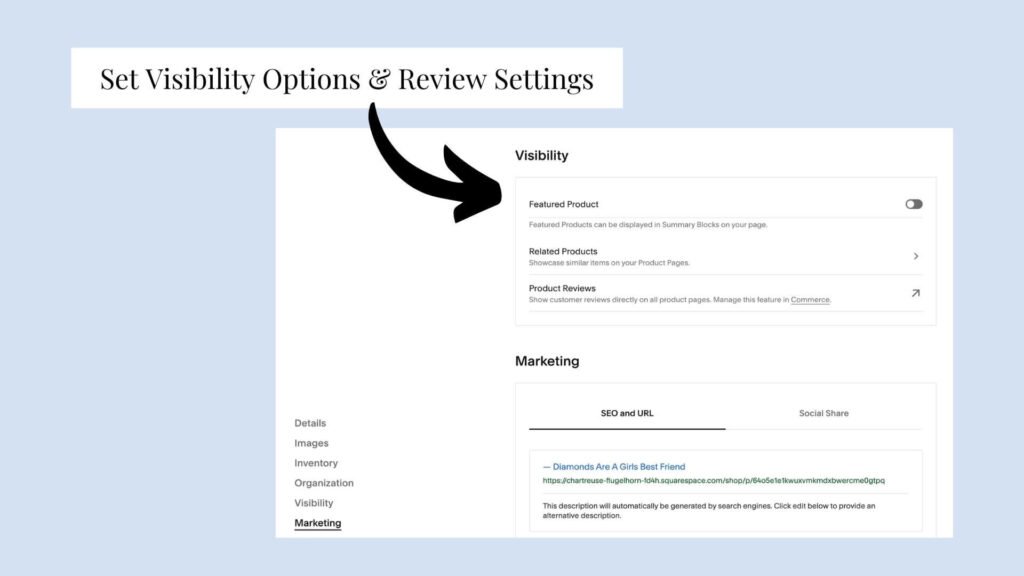
Visibility
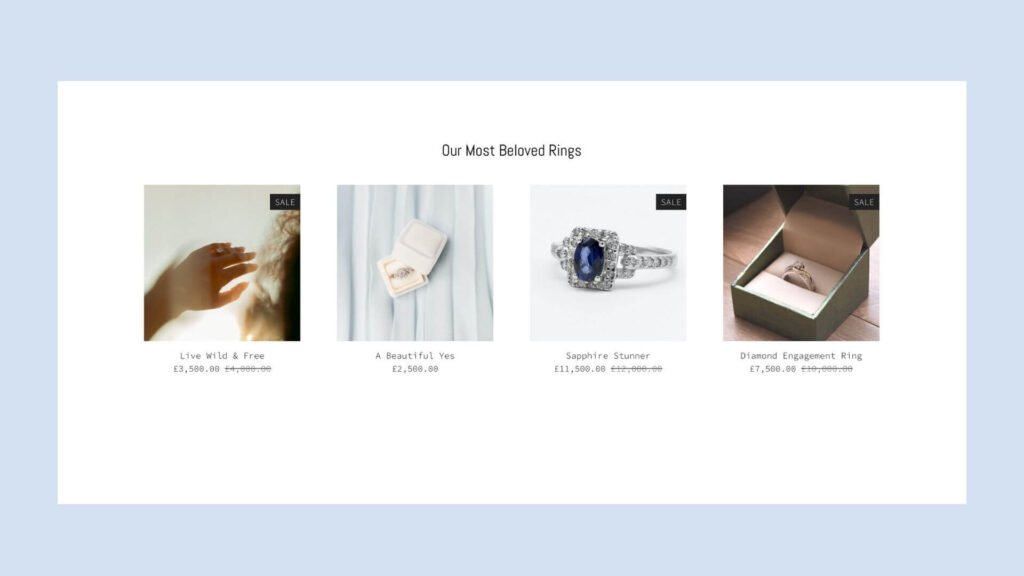
Here we can say whether our product is a "featured product", meaning that it'll show up in a summary block (a block that we can use to show our shop products on other places on our site - like if we wanted to show our best selling rings on our home page) if we toggle on the "only featured products" filter on in the summary block.
Related products is great if you'd like to have certain products come up when your customers are looking at another product. A good example of this could be if we have a model wearing a full outfit that shows when the customer is looking at the Jeans, the rest of the clothes the gal is wearing could be set to be related items.
Marketing
This section has all of the bits n bobs that relate to creating a good SEO description, sharing your listings so people can purchase on socials & your social sharing image itself (it automatically pulls the product image you set as the main one, but if you'd like to change that you can do it here - clever hey?!)
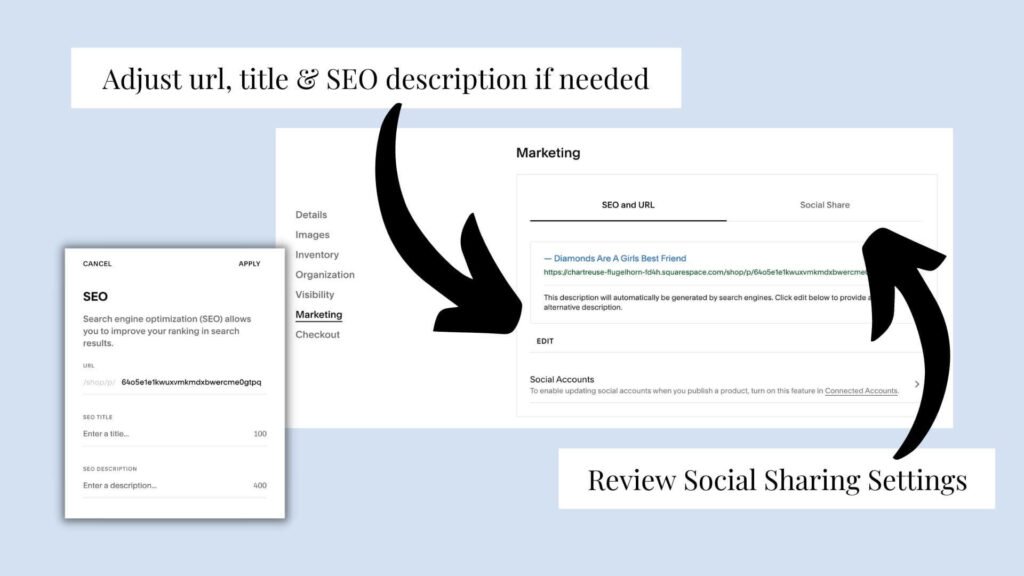
The info under the SEO tab is automatically pulled from your product’s name and description, so as long as you’ve been intentional about using your SEO keywords when writing those, you shouldn’t need to fiddle too much with these settings.
This is also where you can tweak your product page’s URL. Squarespace is going to automatically use the name of your product to create a unique link.
But if you remember from Squarespace basics: blogging, these days it’s best practice to tidy up your URLs by removing any fluff words and keeping only the most important SEO keywords associated with your product.
This is also where you go to upload your thumbnail image (the preview image of the product appearing on your shop page), and change the name of the button used to add that product to the cart.
Want to feature your product somewhere else on your site? Check that box here! Then use summary blocks to display them throughout your site and blog.
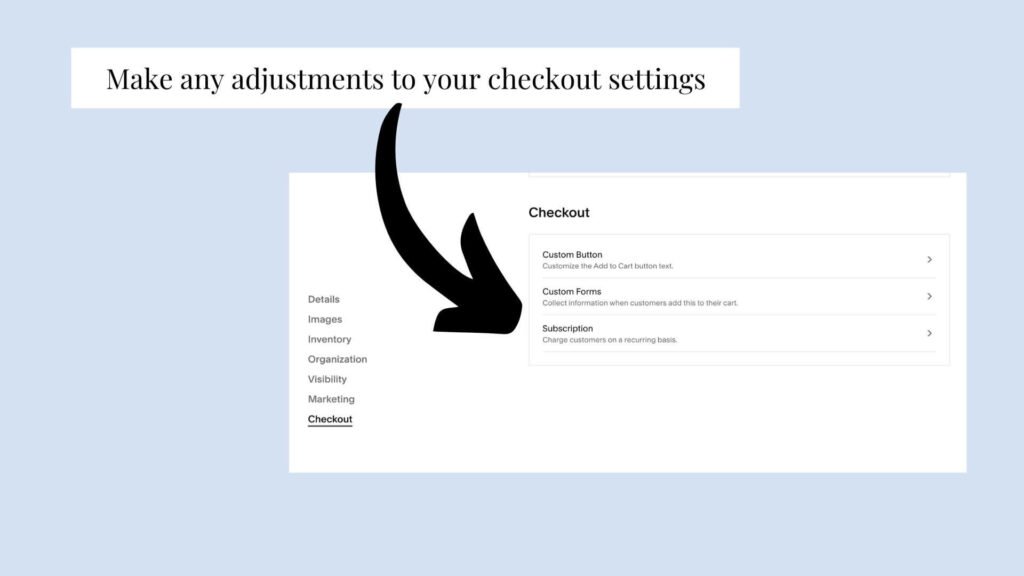
Checkout
Custom button
We can change the check out button to make it different - examples might be things like buy now, or enroll now
Custom forms
This little tab is just another way that Squarespace helps you run your online shop on auto-pilot, and it’s going to save you a tonne of back and forth between you and your customer!
Say for example you sell monogrammed coffee mugs. When a customer makes a purchase, you’re going to need a way to collect the information needed to fill that custom order! Rather than having to send and keep track of a bunch of emails, you can use Squarespace’s built in e-commerce form to collect any additional info you need from the customer before completing their order.
If it's mandatory (like they need to give you this info to fulfil the order) then you click required. Just a nice to have? Leave that friend unticked!
Subscription
Here's where, if you were selling something like a fancy shampoo & you wanted your customers to be able to order an ongoing delivery of the stuff to keep their locks soft n shiny on the daily, you'd set this up as an option for your people.

Saving & Publishing
So now I've filled in allll of the things, I can choose to either save it (this saves a draft of the product & everything I added) or to publish it now (so it becomes live in my store, assuming my store is live of course!) or schedule it to be published at a later date (perfection if I want to release a Spring collection all on one date, but I'll be carvin' it up on the slopes at that moment), I'll set it all up and schedule it for the date I want it to go live & hey presto! You can literally do this down to the minute!
Okie dokie! Now comes the fun part!
Designing and customizing your online shop in Squarespace 7.1
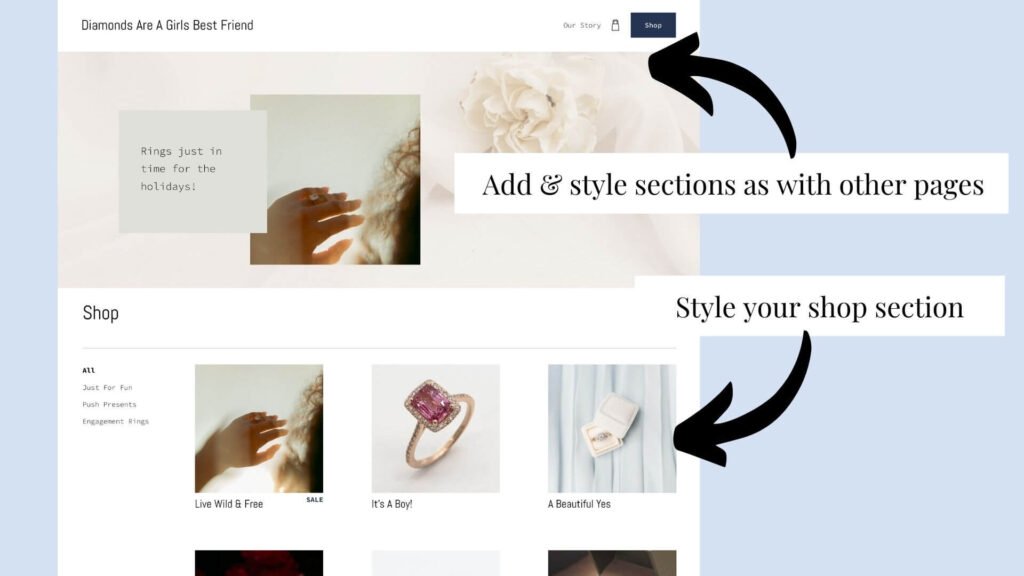
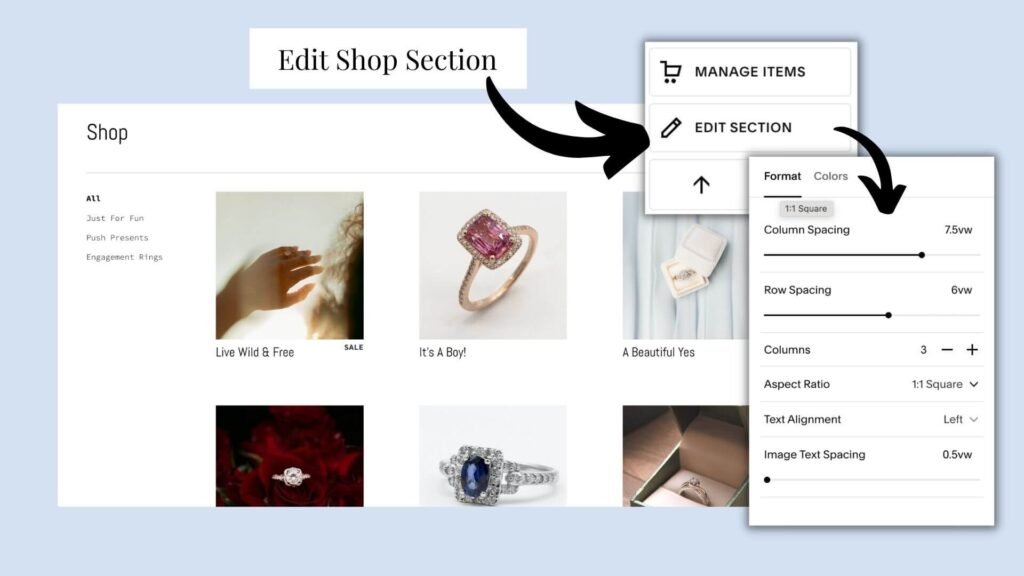
Jazzing up your Store Page
If you read Squarespace basics: pages & navigation options, you’ll know that your shop page automatically comes with a special shop collection section where your products live, and that collection sections cannot be styled in the same way as other sections.
You can, however, add as many sections above and below your shop section as your little heart desires, and you have all the options to add content using blocks to those sections as you would anywhere else on your site (so just like the homepage we designed before!).
So let's head over to our store page.
Pages > Store & Edit
Within the style editor, you have tonnes of options for customizing your store page. Most are honestly just style preferences that you set by playing around with the different sliders and drop down options and deciding what you think looks best. But there are a few options that I’ll quickly touch on below.
Breadcrumbs: Say you sell clothing in your shops. A shop like that is going to have a lot of subcategories! Breadcrumbs are the little trail Squarespace leaves behind when they’ve arrived at a certain page. (ie. shop > clothing > women > dresses > evening gowns.)
By displaying the breadcrumbs, you make it so that the customer can navigate back to any one of those stages by clicking on them, instead of having to start back at square one each time.
Categories type:
Remember when you went under the item tab in the product listing editor earlier in this post and added all your categories to your products?
Squarespace will automatically display those categories in your shop’s navigation. If a customer clicks on that link, it will display only the listings you’ve marked as falling under that category.
Here you can choose if you want people to be able to filter by categories that are displayed at the top, or down the left-hand side. The left-hand side is more common, but you do you!
Columns: I choose how many columns I want (which also impacts the size of the items)
Column spacing & row spacing: This lets me play with how much spacing between the rows and the columns.
Aspect ratio: This is the dimension of your item images - you can choose from Square or a bunch of different rectangular shapes from portrait to landscape.
Don't forget to add other sections
The section that actually shows your products is the only fixed section on your store page. You can add other sections as you'd like. I'd defs recommend adding a top section with a little welcome to your store, (you do this as I walked you through above - just like adding and styling a section on any other page), but apart from that I recommend keeping it simple!
Adding a search bar to your shop page
A search bar can be a super handy tool for helping shoppers to quickly find exactly what they are looking for through a simple keyword search. To add one to your shop, just add block and choose a search bar block. Pretty simple, right?
There’s just one important tweak you may want to make! If someone is searching for something in your shop, you probably don’t want them to have to sift through results from your blog or site.
To limit the search bar to only show products from the shop, check search specific page. Then select your shop.
Squarespace Store Insider tip
Not loving how that special shop collection section looks? Display your products using summary blocks instead!
Remember that I mentioned when we were building our homepage that it'd be fabulous to add a summary block showing off some of your products. Well you can actually do this on any page, including making a "fake shop page" if you like. The process is the same!
Open up your on-page editor
Add a "Summary" block
Connect to your store collection
Add any filters you like (featured products, tags or categories)
Style however you fancy (top tip, to make sure all the thumbnails are the same size if they're not uploaded that way, select the "grid" option and choose your aspect ratio.
You can easily build a brand new shop page from scratch by adding a new blank page (NOT a shop page…that’s important) to your site. Then you simply drag this new shop page into your main navigation.
The summary blocks will allow you to display products from your old shop page, from whatever categories or tags you tell it to. And when a product preview in that summary block is clicked, it will lead straight to that product’s page. No one ever has to know that this isn’t your real “shop page.”
Meanwhile, your original shop page gets moved to the unlinked section of your pages panel where it quietly continues to host/store your products in the background. (Important: don’t delete your old shop page, because that’s technically where all your products still live!)
Downside, this doesn't give you the automatic opportunity to filter by categories (which is great if you have more than a few products), but you can set a filter on a summary block so it just shows products from a certain category
Oh, and just a reminder… (I know I mentioned this before, but it never hurts to say important things twice!) if you’re using summary blocks to display your products anywhere on your site, you have to actually create the products first!
Product Page Design
Once you’ve added all your product listing’s information, it’s time to head to product > edit > edit design to customize the style and layout of your product pages. In the top right corner go to "Edit Section" and here you've got a bunch of options to style up your product page -
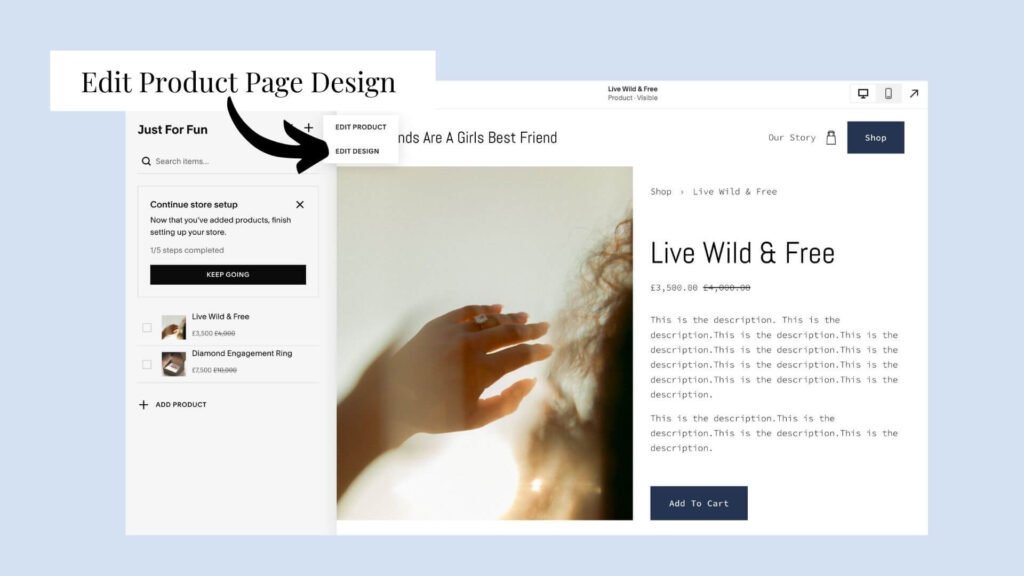
But word to the wise, keep it simple! Fancy, jazzy pages may look lovely but they're often not fantastic for conversion.
Wondering where to go change font, color, button, and spacing options for your product page?
Something tells me you’ll want to revisit this post on using Squarespace’s site styles. You’ll find that product pages have plenty of their own options for styling within each of your font, color, button, and spacing design panels.
Back to our Commerce Options
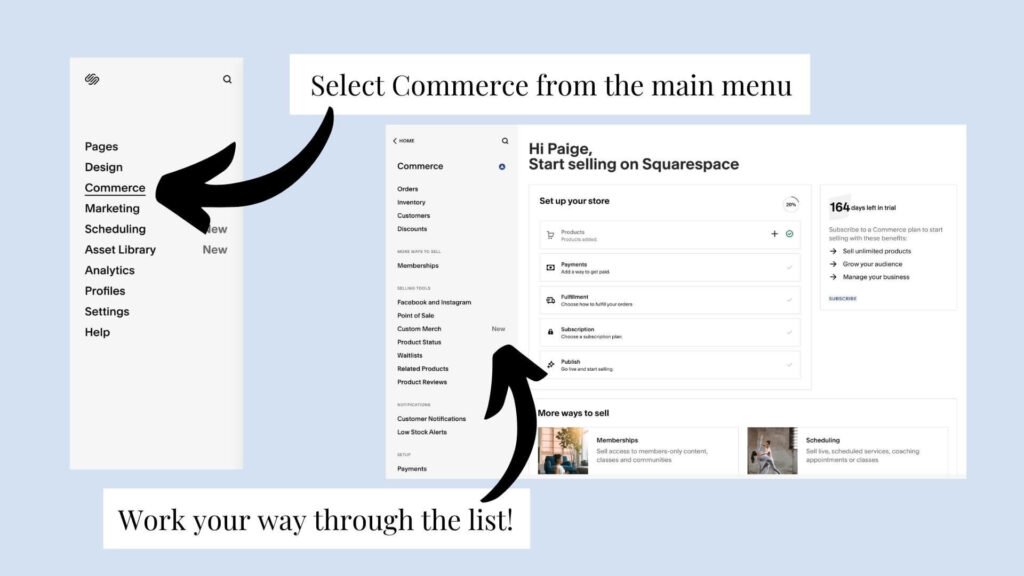
So friend... you've had your chance to be all creative, now we're going back to "commerce options"... I knowwww... it doesn't sound exciting, but it's super important so stick with me.
Go to Main menu > Commerce
Orders
First up is orders, this is where when you get an order in your shop you'll see it (and hopefully cue a mini celebration!)
Inventory
This is where you can keep track of what you have left for any one of your products (it allows you to see when stocks are running low, or anything you're out of)
Customers
This is where you can see a list of people who've ordered from you (they all get their own account in Squarespace), including their contact details in case you need to get in touch.
Discounts
This is where you can manage your discounts (shock!) You can set them by percentage, or total amount, limit the number of uses, have a code (or not), set dates for when they expire or make it so they're only available on a certain product or products, and not everything. Just like for your products you can set discounts to publish & only be available at a certain point in the future.
Facebook & instagram
You can also set it up so that your audience can purchase your products directly from facebook or instagram if you'd like.
Point of sale
This is currently available only in the US, but is useful if you sell in person on occasion (like annual Christmas markets or summin) and you want to connect everything up (this one only works with the Square processor).
Custom merch
So fun!!
This is where you can virtually "create" a design that goes onto a piece of merch, and when someone orders it it's printed on demand & sent to the customer (pros - you don't manage stock, inventory or postage) cons... obvs you make less dollar.
Product Statuses
This is an incredible way to drive sales, by showing people your products are scarce, it also allows you to let people know things are out of stock.
Waitlist
If something's out of stock, instead of just losing the customer you can allow them to join a waitlist & be informed when it's back available!
Related Products
We talked about this before (I know, it already seems like ages ago), so quick reminder, but with a different example... say you're selling kitchen utensils, you might wish to list the non stick appropriate ladel, spatula and spoon as related items for the saucepan they go with (OK the last example with the model was more glam... but let's be real, who doesn't love so fabulous kitchenware!)
Product reviews
This gives you the option to request reviews from your customer and also to import reviews from Etsy if your little heart desires.
Connecting a payment processor to your online shop
At last! All your fabulous products and services have been listed, and you are ready to drop your shop page into your main navigation and launch it to the world!
Not so fast friend, because you’re kinda gunna need a way to get paid first!
As I mentioned above, Squarespace already has a built-in check-out page where customers will go to enter their payment deets, but an additional bit of software is needed to check that your customer is actually good for the money!
Think of a payment processor as the thing that communicates between their bank account and yours. The processor does the work of chasing down the funds and storing them in your payment processor account, before being paid out to your actual business account however many business days later.
Now, you have three payment processor options: Stripe - which is used to collect payment from any major credit card, apple pay or afterpay/clearpay, PayPal (which is obviously used to collect funds from Paypal) or Square (which allows for point of sale) You can choose to connect one or all of these options.
Heads up! Before you can start connecting your payment processor, you are going to need to come prepared with a stripe, square or PayPal account! Then within your payments panel in Squarespace, simply click which one you want to connect and enter in your shiny new login deets!
Oh and btw, you’ll also find the option to change your store currency under the payments panel.
Quick word to the wise here, you can only choose one currency AND if you sell gift cards, once you've sold one you can't change it, so make sure to think it through well before you commit!
Cart & Checkout Pages
Cart
Firsly up here, you can choose to set a custom domain for your checkout as opposed to checking out of a squarespace domain (you'll need a custom domain set up for this too).
You can also set up abandoned cart recovery (a great idea to make sure that people that got distracted, get a reminder - it's fab to boost conversions!) Set a minimum order amount, set service product limits and... very importantly, choose not to have your first customer as order number 1 if you'd prefer to make it look like you've been in business for years!
For receipts, I highly recommend having a chat with your accountant wherever you're based about because taxes... urgh... complicated! And not summin you wanna get wrong!
Checkout
There are a few fabulous things you can customize in checkout settings to make life easier for your customers, like setting the billing address to default to the shipping address (which is the case for most peeps), default the country to where most of your customers are from & some other bits n bobs.
This is also where your privacy policy & Ts&Cs etc live... word to the wise here friends, you need to get your house in order, not only is it good practice, in most places it's the law.
There are a bunch of places you can get legal templates from for these policies (and of course you can also have a lawyer create them) but my fave is The Creative Law Shop - you can get 10% off with PAIGE10 (that's an affiliate link btw - my margarita fund thanks you kindly!)
You have the option to add additional fields to your checkout too... but I'd proceed with caution here friend, the more hoops people have to jump through, the less likely they are to get to the end of the process & buy the thing, so only use this if absolutely necessary.
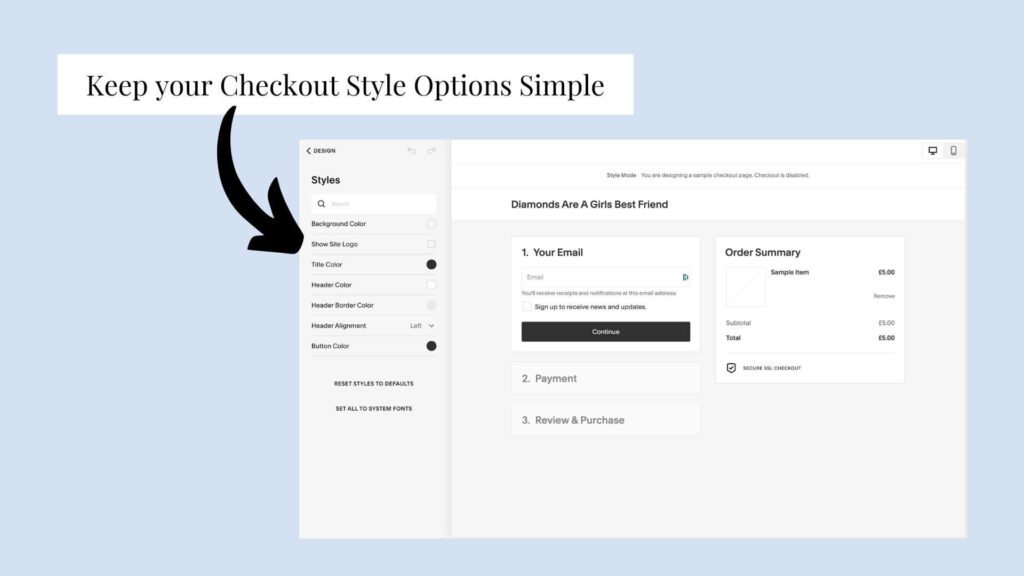
Checkout Style
Ok, so this is one area where you don’t have oodles and oodles of options for customization, but if you ask me, this was a brilliant move on Squarespace’s behalf!
Confusion kills conversion, and the last thing you want to do is confuse your customer right off your checkout page! You want as few distractions as possible when they are reaching for their wallet to buy the thing you are selling, so this wouldn’t be the time to get super creative with your design skills! (Good lookin’ out, Squarespace.)
What you can do tho, is colors, logo etc which is great to make sure you're on brand!
Shipping Options
So we're going to go to add a shipping option, and there's a few different options that we have. Flat rate shipping is that every single item no matter what gets charged the same rate for shipping. Now this makes a lot of sense if say you're doing something like you're selling rings, because they all tend to be about the same size and weight and everything, so it's not that complicated.
Setting shipping options by weight
Buuttt... if you're selling items which are very different, say you're selling different pieces of furniture, then a pillow is gonna cost you a lot less to ship than a couch would. So that's when you could do something like create the shipping options based off the weight of the thing.
Don't forget tho, that in this case, inside of your actual product, you need to set the product weight so that it knows which shipping rate to then charge for that specific item.
You can set which countries you will actually ship to aswell, handy to avoid surprises like needing to ship a couch from Canada to Oz!
Getting delivery costs auto calculated
You also have the option to set delivery to be auto calculated by a few places like FedEx, UPS and USP. And pick up is there too, if you want the option for people to be able to order online & pick up in store.
Taxes
Taxes are something that I would set up and start using once you've actually made your website live. It's super complicated, so worth getting a kindly accountant involved to help!
Do also know that if you are in the US you can also use something called the tax jar extension, where it will do all the complicated everything of figuring out exactly how the tax is calculated.
Accounting
And then finally, accounting. Here you can export all of your sales and share that with your accountant if you need!
Making your online store live
We're nearly there! Told you this was gonna be thorough!
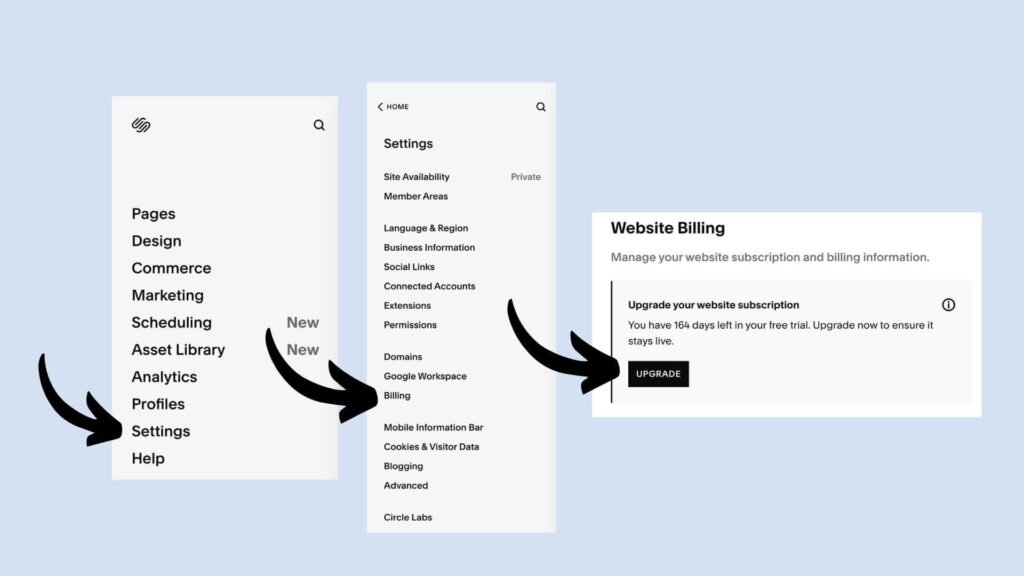
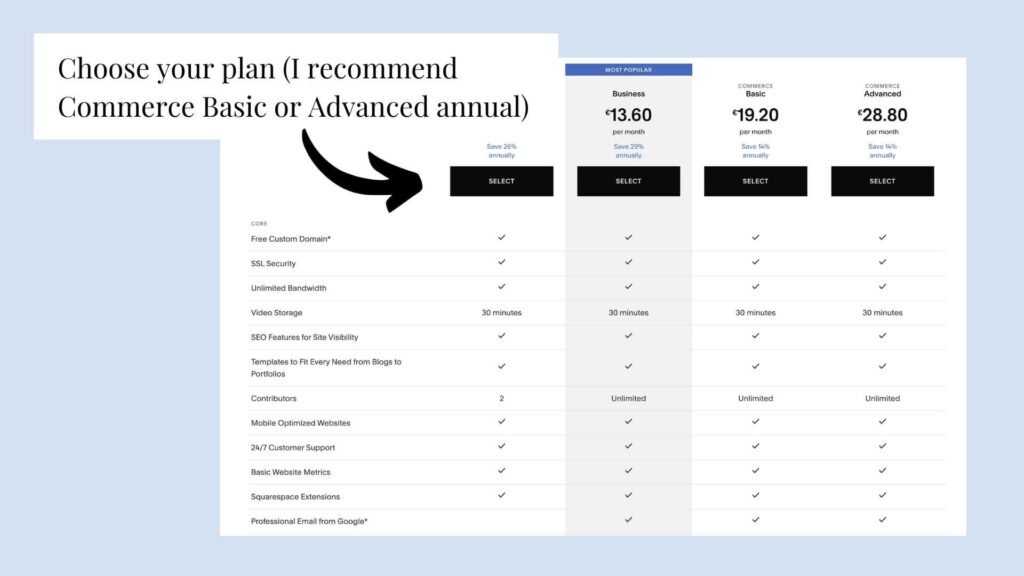
So making your website live ... to do this, head over to settings > billing > upgrade to a plan and then go ahead and select the appropriate plan.
Before you go ahead & do this, take note! I have a 10% off code for you - that's good on your first subscription payment (I strongly recommend you opt for annual to get 10% off your full first year as opposed to just 10% off the first month). You can use this link & code you need is PAIGE10 (that's an affiliate link btw - my margarita fund thanks you kindly!)
How to choose the best Squarespace plan for your online store
If your primary purpose for your website is to be an e-commerce website, then I would suggest actually choosing one of the either Commerce basic plan or commerce advanced plan. You get a lot more options related to running an e-commerce website, so being able to sell your products on Instagram, have limited availability label, have abandoned cart recovery, check out on your own domain etc. You also pay less commission to Squarespace for each sale than you would on the regular business plan.
But what if I can't create my website within the 2 week trial Squarespace gives me?
Okay, now the next question in your mind is probably, when should I start my Squarespace two week free trial. Many people worry about wasting the trial, so they don't wanna start it straight away if they're not a hundred percent sure if they're ready to launch the website in two weeks from now, or they're worried about not having their site done in just 2 weeks.
But let me let you into a little secret...
You can actually live chat with Squarespace and ask them very kindly to extend your free trial again and again and again and again for two more weeks and two more weeks and two more weeks....
I've actually yet to meet anyone who they said, no, you can't extend it anymore.
So just know, seems like there's pretty much no limit on the two week free trial, so you can just go get started with your website right now! So... wadaya waiting for... hop to it!
Jokes... but seriously you don't need to worry about wasting the free trial.
Getting Inspiration for your online shop/ e-commerce site
Even though you now know how setting up shop works, you still have one more major hurdle to overcome, and that's figuring out how this shop should look and finding inspiration for what incredible e-commerce websites lookand function like.
I've gotcha covered friend!
Watch this video, or read this post to see inspirational website examples of some of the absolute best e-commerce websites built on Squarespace.
Feeling a little overwhelmed with all that you need to learn in order to DIY your Squarespace site or online shop? I created my course Square Secrets justttt for you!
Here’s what past Square Secrets student Karen Young had to say…
“Before taking Square Secrets I felt overwhelmed with where to start and how to craft a site that not only looked the part but that made my customers want to buy and to make it easy for them to buy from me.
After taking the course, I finally have a working website that doesn't make me want to run and hide in shame, and I no longer rely on Etsy as my online sales platform!
Having a fully functioning e-commerce website that also acts as a showcase for my custom work helps my business look more professional, and I have been able to increase my prices.
There is nothing more powerful than being in total control of your online front window!”
-Karen Young
The most popular, advanced & comprehensive online course teaching you how to build a Squarespace site that attracts your ideal clients & customers 24/7!