My complete blog post writing process & checklist

So you’ve prob gathered by now that I’m a hugeeee fan of systems in my biz.
I’ve found if I don’t have some sort of easy to reach for checklist or template for the processes I do over and over in my business, things are bound to get overlooked.
Even if I’ve done the thing a million times (like blogging 2X a week, every dang week for years.)
And since this is no longer a one-woman show, and my blog posts tend to change hands a few times before making their way onto the blog for millions of eyes to see, we have a super trusty checklist we use to make sure the ball doesn’t get dropped somewhere along the way, and that every post that goes out can reach it’s fullest potential!
Want a little peek BTS of how my team and I prep my blog posts to go live (as well as a few tips for each step in our process?)
Read on!
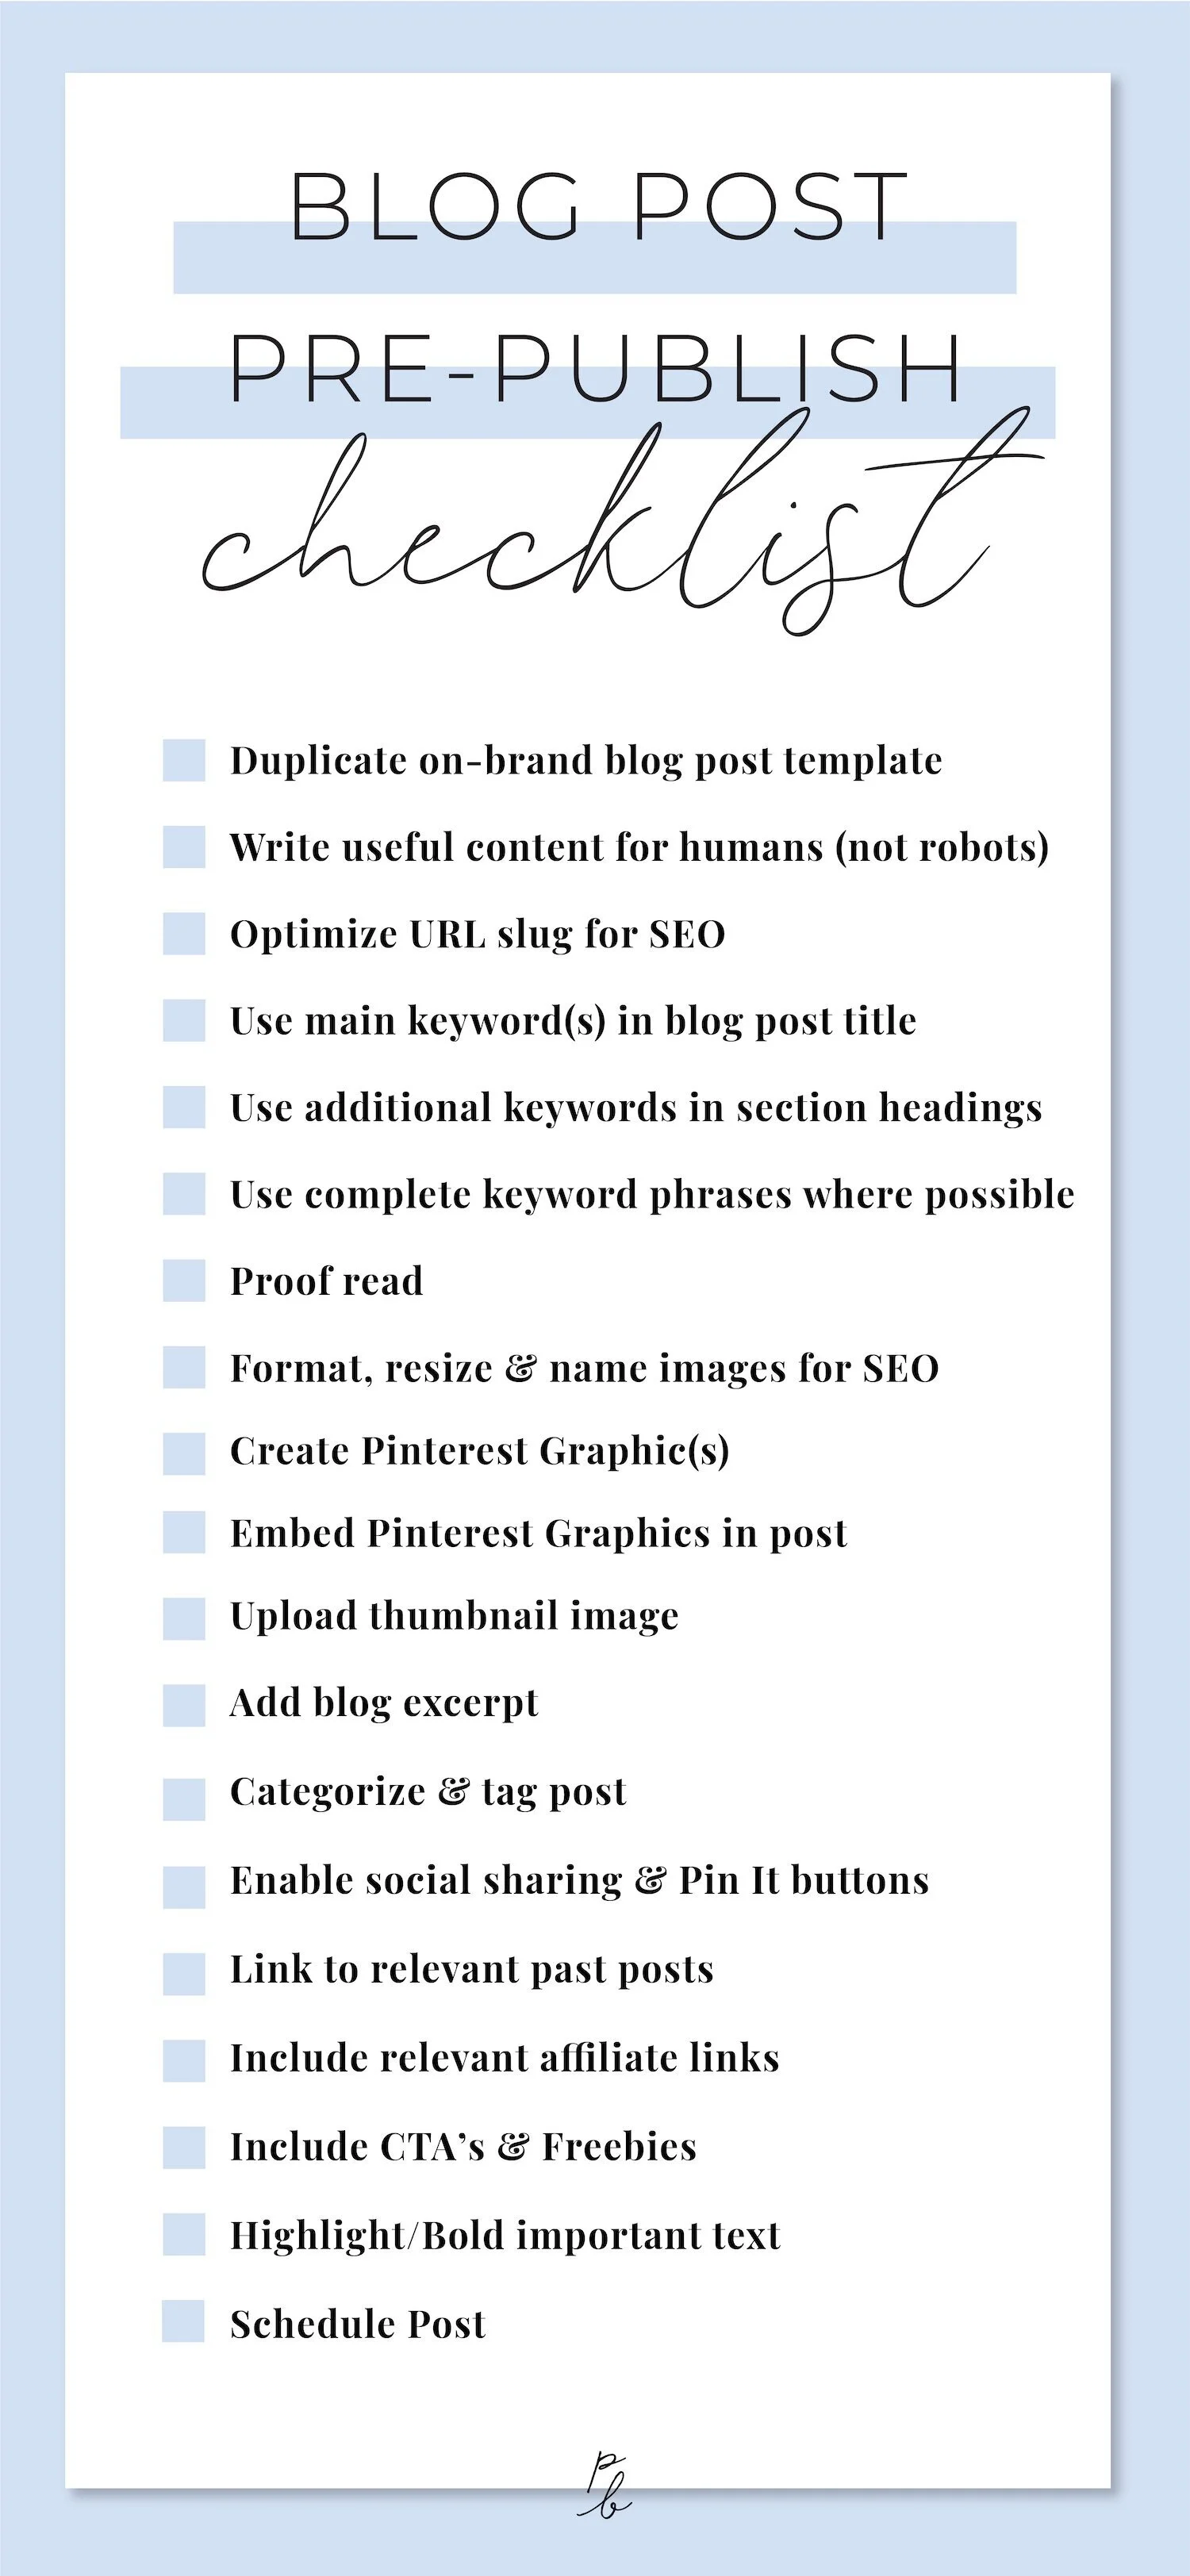
P.S. if you want to snag my checklist for yourself, I included a quick graphic for ya later in the post! But you’ll probably want to brush up on the why’s and how’s I’ve included in this post first so the checklist makes more sense!
Step #1:
Create an on-brand Blog Post Template
I like to to have a blog post template ready for every category I blog about so I can quickly duplicate a post and get to work writing the thing, without having to build out the bits of the post that tend to stay the same week-to-week.
(ie. related freebie opt-in gifts, as well as commonly used code blocks, spacer blocks, and image blocks that help me format the layout of my posts.)
I do the same thing for YouTube show notes, making sure my template already includes a video block/placeholder so all I have to do is drop in the link.
For an intro to setting up a blog post in Squarespace, check out: Squarespace basics: blogging.
2. Write blog content (duh).
“Wow. Thanks Paige…but what should I write on my blog?”
Don’t worry! I’ve got a post for that!
Check out: 5 simple ways to come up with blog post ideas and How To Make An Editorial Calendar For Your Blog
3. Follow SEO Keyword best practices for your blog CONTENT
Think keyword stuffing your content is your ticket to SEO search term ranking success?
Sorry, but Google is totally on to you. Anddd they’ll punish you for it.
Yep. Internet users are fed up with irrelevant fluff pieces, so in order to hold its place in our hearts as the #1 most reliable search engine, Google is doing everything it can to send weary internet travelers to somewhere it knows they will be well taken care of.
Which means the GOOGLE robots are looking for what appears to be genuinely useful content, written for actual humanS...
…where keywords are only included where it can be done in a natural sounding sentence.
A few quick blog content SEO tips to keep in mind:
Keep blog post titles and URL’s short: include only the top few keywords related to your content
Use additional relevant keywords in your blog post headings
Got a longtail keyword or keyword phrase?
Try to use it in its entirety every time you refer to it. This helps Google better understand your content and make it more likely for you to appear in a search for that term. (ie. Using the phrase “Squarespace blog" throughout your post rather than blog.) But again, only where it feels natural and relevant to write it!
Want to earn some truly good and lasting SEO karma?
Focus on being useful. The more useful you are, the more links back you’ll have from other reputable sites, and the more likely it is that readers will come back for more (and I don’t have to tell you how much Google likes that).
4. Proof read
I love the Grammarly Chrome Extension for a first pass, but they don’t always love my Paige-isms. 💁♀️
So rather than allow (a rather snobby) robot to rewrite my whole post, I use it to quickly spot the actual typos, then mark the post as “needs review,” passing it on to my assistant (a.k.a a real set of human eyes) to handle the rest.
Wondering how to start outsourcing some of these tasks in your own biz? You might like: Looking to hire a virtual assistant? Here's the step-by-step process of how I did it and Are you financially ready to hire a VA? Answered.
5. Optimize blog post images
Keywords aren’t the only way to wrack up SEO brownie points for your blog post!
The way you format your images prior to uploading goes a long way in whether Google deems your content as super useful or totally irrelevant and boring AF.
(Because nobody is ever going to care about an image named image357876.jpg, and neither will Google.)
Not to mention Google shies away from slow-loading sites. Yikes!
It’s literally the easiest thing you can do to optimize your site for SEO and you can head over to that link to see how it’s done!
But what if I don’t have images to use in my blog post?
Unless you are a photographer, you probably don’t have endless images in a Google Drive folder somewhere to go sticking in every blog post.
Enter: stock photos.
Check out this post for a few ideas for where to find them! 10 Guaranteed No-Fuss Stock Photography Websites
6. Update your Squarespace blog post settings
Here’s a quick list of things I check off with every post:
Upload thumbnail image: Seems obvious, but this setting is kind of tucked away, so it’s super easy to forget and end up with a thumbnail from a previously duplicated post. #SpeakingFromExperience 🤦♀️
Optimize blog post URL: Remember, only those main keywords make the cut!
Add a blog post excerpt (More on what to add, as well as tips for making all these tweaks to your blog post settings in my Squarespace blog post pre-publish checklist.)
Add relevant categories & tags (More on that in Squarespace tags + categories: A complete guide, and How to use Squarespace tags and categories to organize your site.)
7. Make it shareable
Pinterest Pin It buttons enabled on the blog? Check!
Squarespace social share buttons all linked up and ready? Check!
Got a graphic or two worth sharing? Check!
Not sure if you have your bases quite covered here? You’ll want to check out this post: 6 website tweaks for super-shareable blog posts
Sidebar: I like to have a few different Pinnable graphics in each post to catch the eye of different people who might stumble upon my post on Pinterest. But since they tend to be variations of the same blog post title/preview, I don’t necessarily want all of them showing up in the post.
Here’s How to hide Pinterest images in a Squarespace blog post!
8. Link to past relevant content
You’ve written some seriously helpful stuff, but if someone is new to your biz, they may never stumble upon that post from two years ago that literally answers every last question they have on your topic.
So unless you have some giant, exhaustive index of past posts (*insert cute nerd emoji*) linking to past relevant posts is the quickest way to help readers cherry pick from hundreds of blog posts, making for a much more personalized experience with your brand.
Oh, and by queuing up a bunch of interesting reads specific to what that visitor came in search of, you’ve now just made your blog taco-tuesday-level bingable. 🌮
9. Include CTA’s throughout
Blogging is literally one of the most natural and sleaze-free ways to market your business, because if you are religiously blogging about a super niche topic, the people who seek out your super specific free content are the most likely to be genuinely interested in a paid offering on that same topic!
Use a strong call to action (CTA) to point readers to a super relevant, too-good-to-pass-up freebie, and watch as your blog builds your email list (a.k.a future potential clients & customers) for you!
Wondering what to offer? Check out: 3 steps to creating an opt-in gift your audience can’t wait to subscribe for.
(Here’s a peek at how I shout out about my freebies. Go ahead and grab any that tickle your fancy!)


Got a paid product or service! Plug that too!
But depending on your goals, you might want to make a freebie opt-in the priority over heading straight for your checkout page as a new/cold lead. (Can you say abandon cart!?)
P.S. You’ll probably want to check out How to make sure your Squarespace website is set up to convert to make sure there aren’t any other super simple things you may be missing when it comes to getting readers and site visitors to take action.
10. Include relevant affiliate links in post
So you probably don’t need to go spamming your audience with an affiliate link to every last product you’ve ever added to your wishlist on Amazon. But if it’s relevant to your post, and you legit use and recommend it yourself, include it (with a disclaimer of course!)
You’re here to provide genuinely useful tools to your audience, but rather than trying to be the master of alllll the things, it may be worth seeking out affiliate partnerships for businesses and industries you already tend to brush virtual shoulders with on the daily.
Suggested reading: 3 reasons you should affiliate for other businesses’ products
11. Use headings & font styling to highlight important ideas
Not everyone has time to read your 2000+ word monster blog post, but if you want to be helpful to your speed readers (while still appeasing the SEO gods with a minimum word count) use your headings to indicate clear sections to make your post super skimmable.
use bolded text or headings to highlight mic-drop moments in your blog post.
You basically want to draw attention to anything that speaks to the pain points you are trying to help readers solve with that post to let them know you feel them, and you totally have their backs!
12. SChedule blog post
I tend to blog in batches, because scrambling to come up with a post the day before it needs to go live pretty much guarantees a fluff piece. (See: 31 random facts about me & what I do when not working) 😂
Yup. I’ve totally done that. And while it can be super fun and a refreshing change to quickly ramble off a few facts about what you are up to in life and biz, in the end it’s not a super helpful post so you prob don’t want to make a habit of it.
So batching the bits of your workflow (research a bunch of posts, outlining the ideas for them, writing the drafts, then prepping them all for publishing) can definitely help you to stay consistent in both the frequency and the quality of what you post!
Pro-tip: Only schedule a post when it’s 100% ready and you have no plans of going back and making changes or edits, because if it’s scheduled, whether you are ready or not, it is going to go live the date and time you told it to.
If you struggle with consistency, here are 6 tips for creating consistent content in your online business!
Phewf! That’s it! Your blog post is ready to make its debut and bring all the delicious organic traffic goodness to your biz.
Oh, and here’s that complete template/checklist if you want to snag it for your own workflow! Happy blogging!